The thing I most love about this hobby is that one minute you're shooting sawdust everywhere and generally making a huge mess and the next minute your working with sumptuous, silk fabrics! First of all, here are my 'finished' curtains:

I ran back to the bead store and picked up some brass jump rings, which are the perfect thing for hanging miniature drapes! They're simply stitched on to the pleats. There were a few tense moments trying to finagle the rods through the tiny eyelets and around the fireplace chase, but thankfully, it all worked out in the end. (I have to run some more starch through the curtain fringe --it's sticking out a little, LOL!
In front of the window is the sweetest little globe I received for Christmas --thanks, Greg! I LOVE it! It came from Masters Miniatures in England.
As you can see in the above photo, I STILL have not installed the crown molding. Someone asked me this week how you cut the pieces of molding to fit the corners and so I thought I'd show you, before they are all glued in.
First of all, I always mark my crown molding with little 'X's across the top side, which will butt against the ceiling. It's very easy to get mixed-up because sometimes the molding looks pretty much the same up-side-down as right-side-up! And it is quite upsetting if you cut your molding up-side-down when you only have enough to go around the room once, with no mistakes. (Not that that EVER happens to me)!

I always start with the 'back' wall of the room. This happens to be the easiest --just measure the length of the wall and cut your molding to match. Use straight (ninety degree) cuts. (above) You can make the cuts with a miniature miter box if your molding is wood and less than a half inch thick. My molding is a little thicker than that (and it also is made from cast resin), so I used a normal-sized, power miter box just to speed things up a tad.
Next, we'll make the first corner cut. For this cut, you need a coping saw. (below) You can pick one up at any hardware store and they're not too expensive. Make sure you get some extra blades!
 It might help before we continue if I first show you the next cut. This is how the corner joint will fit: (below)
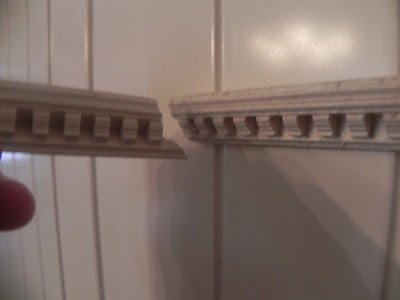 See how the angled edge will fit on top of the other piece, like a little puzzle? (above) Here's how to do it...
 With a pencil, trace the outline of your molding onto the corner. (above) This is your cutting line. You can use your miter box to remove the section up to the pencil line. Then use the coping saw to remove the small bits up to the line.
 Here's how the corner fits together. (above) You can fine-tune the joint with a small file or sandpaper. Any small gaps can be filled with Spackle, gesso or wood putty.
Make the other corner of your room the same as above. If you have any 'bump-outs,' such as a fireplace chase, the corners are made by making two, forty-five degree cuts on the miter box: (below)


TIPS:
When cutting resin molding by hand, take your time: the heat generated by the moving blade will start to 'melt' the resin and gum up your saw.
Do not try to make the 'coped cuts' in one pass. Remove small pieces at a time until you meet up to the penciled line.
Buy extra molding in case you make a mistake!
Some of the fancier moldings (such as Sue Cook's) can be purchased with pre-formed corners.
And that, my dears, concludes our little lesson du jour! (I hope it helped, Gwendolyn)... Next time, I promise to have the crown molding glued into place! But before I sign off, I wanted to thank everyone again for your kind words regarding my recent ghastly run-in with the shingles virus! I am happy to report that all is well and I can't even begin to tell you how thankful I am for all your thoughtful, well-wishes!

I ran back to the bead store and picked up some brass jump rings, which are the perfect thing for hanging miniature drapes! They're simply stitched on to the pleats. There were a few tense moments trying to finagle the rods through the tiny eyelets and around the fireplace chase, but thankfully, it all worked out in the end. (I have to run some more starch through the curtain fringe --it's sticking out a little, LOL!
In front of the window is the sweetest little globe I received for Christmas --thanks, Greg! I LOVE it! It came from Masters Miniatures in England.
As you can see in the above photo, I STILL have not installed the crown molding. Someone asked me this week how you cut the pieces of molding to fit the corners and so I thought I'd show you, before they are all glued in.
First of all, I always mark my crown molding with little 'X's across the top side, which will butt against the ceiling. It's very easy to get mixed-up because sometimes the molding looks pretty much the same up-side-down as right-side-up! And it is quite upsetting if you cut your molding up-side-down when you only have enough to go around the room once, with no mistakes. (Not that that EVER happens to me)!

I always start with the 'back' wall of the room. This happens to be the easiest --just measure the length of the wall and cut your molding to match. Use straight (ninety degree) cuts. (above) You can make the cuts with a miniature miter box if your molding is wood and less than a half inch thick. My molding is a little thicker than that (and it also is made from cast resin), so I used a normal-sized, power miter box just to speed things up a tad.
Next, we'll make the first corner cut. For this cut, you need a coping saw. (below) You can pick one up at any hardware store and they're not too expensive. Make sure you get some extra blades!


Make the other corner of your room the same as above. If you have any 'bump-outs,' such as a fireplace chase, the corners are made by making two, forty-five degree cuts on the miter box: (below)


TIPS:
When cutting resin molding by hand, take your time: the heat generated by the moving blade will start to 'melt' the resin and gum up your saw.
Do not try to make the 'coped cuts' in one pass. Remove small pieces at a time until you meet up to the penciled line.
Buy extra molding in case you make a mistake!
Some of the fancier moldings (such as Sue Cook's) can be purchased with pre-formed corners.
And that, my dears, concludes our little lesson du jour! (I hope it helped, Gwendolyn)... Next time, I promise to have the crown molding glued into place! But before I sign off, I wanted to thank everyone again for your kind words regarding my recent ghastly run-in with the shingles virus! I am happy to report that all is well and I can't even begin to tell you how thankful I am for all your thoughtful, well-wishes!


21 comments:
What a beautiful room! The curtains are gorgeous. I love the brass rings. Thank you for the tutorial. More pictures of everything please. ;-)
Hello John, you've done a wonderful job with the curtains, as was to be expected :-)
The library is now sumptuous.
Thanks for the explanations on cutting molding: I must admit that this is one of the great bugbears for me!
Mini hugs,
Flora
Wow it is looking great! Beautiful :)
I had to do those coping cuts in my RL house (baseboards, not crown molding!) Not fun.....
¡Hola John! Son unas cortinas realmente maravillosas, me encantan! La biblioteca se ve majestuosa con ese papel tan elegante y esos muebles. ¡Gracias por la explicación sobre cómo cortar correctamente las molduras de resina, nunca he trabajo ese material.
¡Un abrazo enorme!
Fabulous as usual!!
I just love the brass rings and the drapes they look beautiful. The Globe is gorgeous too, nice find!!
Thanks for the tutorial, I didn't realise you made a straight cut for the back. I think I 45 dgr mitre cut them and didn't think to do it the other way.It makes more sense to do it your way. Not that my cornices are fancy like yours though!!!
ML Fi xx
Fi, I think you will find your cornice will fit together better --even a 'plain' cornice-- if you cut them this way!
Your room is beautiful and the curtains look stunning! thanks for the tutorial on crown moulding. I don't care how many times I see someone do it, I still end up cutting at least one corner wrong.
Dale
Your curtains look wonderful! Big thank you for the tutorial on the cornice. It was just last week I was trying to remember how to do it that way and I could'nt!! I've not got to go and cut some cornices!! Thank you and I look forward to your posts and your work. Carrie
John,
Crown molding is tricky. You have done a wonderful job. Your curtains look really great! I can't wait to try out your fringe technique. I noticed our local Hobby Lobby has all kinds of new jewelry accessories that would be great for curtains, lights fixtures etc.
I like your globe too - You have great taste!
I appreciate the coping tutorial -- it always stretches my spatial abilities to their utmost trying to deal with that! Love the globe and the colours are just beautiful.
Hello John, lovely curtains, and thank you for the tutorial.
Your room looks fantastic with the curtains in place! I can't wait to see the crown molding in place, it makes such a difference to a room once they are installed.
¡ Qué cortinas más bonitas y más perfectas ! El conjunto queda elegantísimo y muy señorial. El papel rojo de las paredes me encanta. Besos
John, the drapes are hanging gorgeous on those brass rings, great work! I really love the fringes, the colors of your curtains and the wallpaper.
Thanks for the tutorial, I did work on the corners like Fi did, I've never seen it this way. I'll have to try this in the future, it makes sense to do it your way!
Hugs, Ilona
Hi John! Thanks for the cornice Tutorial! I have always just tried to do the 45 degree angle thing on all the cuts! I will have to give your method a try! I am sure it will fix all the gaps I usually end up with!! And your curtains look Gorgeous!!! What a Magnificent Room!!!
I think my comment of yesterday must have disappeared into cyber space.
I love your finished curtains, they are gorgeous! I am looking forward to see the crown molding installed.
John, thank you for posting an easy, well-photographed guide to cutting crown molding! I couldn't find one when I was cutting the molding for my French townhouse and it just gave me fits...look closely enough in a couple spots and you can see where I've had to fill a few gaps with plaster (eek!).
glad to hear you are feeling better and thanks for sending me out to buy another tool?!?! (God knows what I'll come back with but I'm going to go look for a coping saw)
Love
Marisa :)
John you are not a mini angel, but a real life one! I copied this info and I am going to get someone to help me do it in person just to get the hands-on feeling right.
THANKS! AGAIN AND AGAIN AND AGAIN!
That room is such a gorgeous colour. It looks so warm even without the lighting and you've made an excellent job of your curtains. They look splendid!
Definitely an elegant, lavish, sumptuous and perfect room for your house!!!
I´ve followed you for a long time, so now, that I´ve created a blog I´ve linked you! If you like to take a look here is the link http://riversidemanorproject.blogspot.com.es
Post a Comment